Using ASP.Net MVC to Create a Simple VoiceXML Application
This is a continuation on a series focused on developing VoiceXML applications using ASP.Net and other Microsoft technologies. In today's post we will look at putting together a simple application using MVC 3.0 and Razor. This assumes you have some familiarity with ASP.Net, Visual Studio 2010, and VoiceXML. A good reference for VoiceXML can be found on Voxeo's Developer Website. We will start out by creating the typical "Hello World" application.
MVC stands for Model/View/Controller which is also a design pattern. You can find a pretty good description of this pattern on the Microsoft Patterns & Practices Website. Basically this pattern allows for more flexible and robust applications by separating concerns into these three areas. The Model represents the application domain, The View represents the information being displayed to the user, and the Controller mediates between the Model and the View by taking user input to control the flow of the application. You could argue that the design approach I will be using is closer to the Model-View-ViewModel (MVVM) design pattern but ASP.NET MVC supports this deisgn pattern as well. In our implementation the View is the VoiceXML that will be presented to the VoiceXML browser (i.e. the IVR platform), the Model will actually be a ViewModel that represents the VoiceXML syntax abstracted up to a higher level, and the Controller will be used to determine the voice application call flow. Since this is a simple "Hello World" application we will not have an application domain and therefore the Model. We will explore how to implement the application domain in later posts.
The Views and Controller for this application are in a reusable library called VoiceModel which is open source and can be found on CodePlex. There is a fair amount of code for the VoiceModel Project and it will continue to grow as we add more functionality in later posts. So rather than list all of the code in this post you can download the complete project here to view the code. The source code for this "Hello World" example is contained in the project directory called Examples.
First create a new project by selecting File/New/Project... and from the project options select ASP.NET MVC 3 Web Application. If you do not have this option then MVC 3 is probably not installed on your system. You can install MVC 3 from the official ASP.NET MVC Website, or the Microsoft Web Platform Installer. Name your project HelloWorld and select OK. This will bring up a dialog box with options that looks like this...
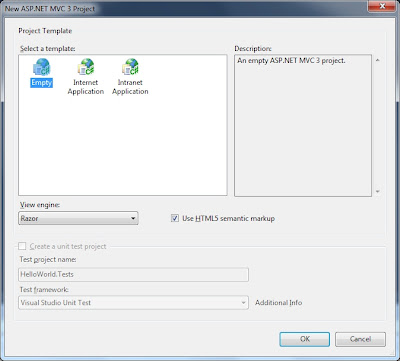
Go ahead and select the Empty project template and make sure the View engine is set to Razor. Select OK. Visual Studio will create a project that has the basic directory structure for an MVC application and a few files. Your solutions should look something like this...

In MVC Views you can have something analogous to the Master Page in ASP.Net web forms. The default is in a file named _Layout.cshtml. This template as the bases for all of the documents that will be presented to the VoiceXML browser since all documents have a common layout, such as the xml and vxml tags. The code for the _Layout.cshtml in in the VoiceModel library and it looks like this...
VoiceModel automatically copies this view and other required views into your project or runtime directory when the application is started.
This is the template for all VoiceXML documents that will be generated. It uses the ViewModel called VoiceModel to determine what to render. It can optionally list the application root document and any properties associated with the application. The Razor element @RenderBody() is where the rest of the document will be rendered and will be specific to the functionality we are trying use in the IVR system. For our simple Hello World Application we just need the IVR to use Text-To-Speech (TTS) to voice "Hello World" to the user. VoiceModel contains a simple View that called Say that will handle this.
The Say object inherits from VoiceModel and has all of the information to handle rendering the VoiceXML document needed to present a prompt to the user. Say is a high level abstraction of something you commonly need to do in an IVR application. As this series progresses we will design other objects such as Ask which will prompt a user and then listen for input. The prompt can be TTS or an audio file. That is why there is an interface called IAudio that has two implementations, Audio and TtsMessage. Generally a prompt can be a concatenation of both TTS and audio information. The object ResourceLocation is used to indicate where resources like the audio files are located. Separating this out is useful because we can change the resource location once and it can apply for the whole application.
Since VoiceModel handle all of the Views we just need to create a Controller for our application. First create a Controller by right-clicking on the Controller directory in the Solution Explorer and selecting Add/Controller... You should see a dialog that looks like this...

Name the Controller HomeController and select Empty Controller as the template, then press Add. HomeController is the default controller that will be used when you start the web application. Now lets add the code for our controller.
That is all we need to create our "Hello World" application. The controller inherits from VoiceController and we just need to override two methods of the base controller. BuildVoiceModels defines the views that will be presented to the VoiceXML browser. In this case I used an Exit view instead of the Say view because we are just prompting the user then hanging up.
We also need to define the call flow in the virtual method BuildCallFlow. This defines the state machine that will be used to determine how the application will flow based on events in the application. This one is very simple and has one state to render the view with the ID of "greeting" that we defined in the method BuildVoiceModels.
That is all of the code required to create our application. It will use the information in the ViewModel Exit to create the required VoiceXML for our application. The Razor syntax is clean and easy to follow. The Exit object can have multiple prompts, and prompts can have multiple TTS and audio files to voice back to the user. Now lets looks at the VoiceXML that is generated by our test application by pressing Ctrl-F5 to run the application. This should bring up a web browser with this content.

In my next post I will show you how to test your application using Voxeo's Prophecy IVR. This is any easy to use and robust IVR platform that you can get a 2-port version for FREE and test your VoiceXML applications on. This is a full blown version of the IVR which was recently mentioned in a DataMonitor report as being a leader in the IVR market. After we learn how to test our applications I will evolve this design to something that can be used for more advanced applications. So stay tuned.
MVC stands for Model/View/Controller which is also a design pattern. You can find a pretty good description of this pattern on the Microsoft Patterns & Practices Website. Basically this pattern allows for more flexible and robust applications by separating concerns into these three areas. The Model represents the application domain, The View represents the information being displayed to the user, and the Controller mediates between the Model and the View by taking user input to control the flow of the application. You could argue that the design approach I will be using is closer to the Model-View-ViewModel (MVVM) design pattern but ASP.NET MVC supports this deisgn pattern as well. In our implementation the View is the VoiceXML that will be presented to the VoiceXML browser (i.e. the IVR platform), the Model will actually be a ViewModel that represents the VoiceXML syntax abstracted up to a higher level, and the Controller will be used to determine the voice application call flow. Since this is a simple "Hello World" application we will not have an application domain and therefore the Model. We will explore how to implement the application domain in later posts.
The Views and Controller for this application are in a reusable library called VoiceModel which is open source and can be found on CodePlex. There is a fair amount of code for the VoiceModel Project and it will continue to grow as we add more functionality in later posts. So rather than list all of the code in this post you can download the complete project here to view the code. The source code for this "Hello World" example is contained in the project directory called Examples.
First create a new project by selecting File/New/Project... and from the project options select ASP.NET MVC 3 Web Application. If you do not have this option then MVC 3 is probably not installed on your system. You can install MVC 3 from the official ASP.NET MVC Website, or the Microsoft Web Platform Installer. Name your project HelloWorld and select OK. This will bring up a dialog box with options that looks like this...

Go ahead and select the Empty project template and make sure the View engine is set to Razor. Select OK. Visual Studio will create a project that has the basic directory structure for an MVC application and a few files. Your solutions should look something like this...

In MVC Views you can have something analogous to the Master Page in ASP.Net web forms. The default is in a file named _Layout.cshtml. This template as the bases for all of the documents that will be presented to the VoiceXML browser since all documents have a common layout, such as the xml and vxml tags. The code for the _Layout.cshtml in in the VoiceModel library and it looks like this...
@model VoiceModel.VoiceModel
<?xml version="1.0" encoding="utf-8" ?>
<vxml version="2.1"  xmlns="http://www.w3.org/2001/vxml"
xmlns:xsi="http://www.w3.org/2001/XMLSchema-instance"
xsi:schemaLocation="http://www.w3.org/2001/vxml http://www.w3.org/TR/voicexml20/vxml.xsd"
@if(@Model.AppName != null)
{
    @: application="@Model.AppName"
}>

    @foreach (var property in Model.properties)
    {
        <property name="@property.name" value="@property.value"/>
    }

    @if (@Model.json != null && @Model.json != "")
    {
       <script>
        <![CDATA[
            var d = @Html.Raw(Model.json);
        ]]>
       </script>

    }

    @RenderBody()
</vxml>
VoiceModel automatically copies this view and other required views into your project or runtime directory when the application is started.
This is the template for all VoiceXML documents that will be generated. It uses the ViewModel called VoiceModel to determine what to render. It can optionally list the application root document and any properties associated with the application. The Razor element @RenderBody() is where the rest of the document will be rendered and will be specific to the functionality we are trying use in the IVR system. For our simple Hello World Application we just need the IVR to use Text-To-Speech (TTS) to voice "Hello World" to the user. VoiceModel contains a simple View that called Say that will handle this.
The Say object inherits from VoiceModel and has all of the information to handle rendering the VoiceXML document needed to present a prompt to the user. Say is a high level abstraction of something you commonly need to do in an IVR application. As this series progresses we will design other objects such as Ask which will prompt a user and then listen for input. The prompt can be TTS or an audio file. That is why there is an interface called IAudio that has two implementations, Audio and TtsMessage. Generally a prompt can be a concatenation of both TTS and audio information. The object ResourceLocation is used to indicate where resources like the audio files are located. Separating this out is useful because we can change the resource location once and it can apply for the whole application.
Since VoiceModel handle all of the Views we just need to create a Controller for our application. First create a Controller by right-clicking on the Controller directory in the Solution Explorer and selecting Add/Controller... You should see a dialog that looks like this...

Name the Controller HomeController and select Empty Controller as the template, then press Add. HomeController is the default controller that will be used when you start the web application. Now lets add the code for our controller.
using System;
using System.Collections.Generic;
using System.Linq;
using System.Web;
using System.Web.Mvc;
using VoiceModel;
using VoiceModel.CallFlow;

namespace HelloWorld.Controllers
{
    public class HomeController : VoiceController
    {
        public override VoiceModels BuildVoiceModels()
        {
            VoiceModels views = new VoiceModels();

            //Use the Exit object instead of the Say object
            //because this just plays a prompt and exits.  The
            //Say object expects a transition to another state
            //or object.
            views.Add(new Exit("greeting", "Hello World"));

            return views;

        }

        public override CallFlow BuildCallFlow()
        {
            CallFlow flow = new CallFlow();
            flow.AddStartState(new State("greeting"));
            return flow;

        }


    }
}
That is all we need to create our "Hello World" application. The controller inherits from VoiceController and we just need to override two methods of the base controller. BuildVoiceModels defines the views that will be presented to the VoiceXML browser. In this case I used an Exit view instead of the Say view because we are just prompting the user then hanging up.
We also need to define the call flow in the virtual method BuildCallFlow. This defines the state machine that will be used to determine how the application will flow based on events in the application. This one is very simple and has one state to render the view with the ID of "greeting" that we defined in the method BuildVoiceModels.

In my next post I will show you how to test your application using Voxeo's Prophecy IVR. This is any easy to use and robust IVR platform that you can get a 2-port version for FREE and test your VoiceXML applications on. This is a full blown version of the IVR which was recently mentioned in a DataMonitor report as being a leader in the IVR market. After we learn how to test our applications I will evolve this design to something that can be used for more advanced applications. So stay tuned.


Comments
Post a Comment